System configuration
- 09 Nov 2022
- 23 Minutes to read
- Contributors


- Print
- DarkLight
System configuration
- Updated on 09 Nov 2022
- 23 Minutes to read
- Contributors
- Print
- DarkLight
Article summary
Did you find this summary helpful?
Thank you for your feedback!
Before you start using the system, you MUST go through this document FULLY to properly configure the system. Partial configuration, skipping steps or incorrect configuration can lead to unintended consequences.
You will not get support for issues that stem from skipping configuration steps.
This process may take a couple of hours but it is critical to be completed prior to using the system. It is also best to do this from a desktop computer with a proper browser instead of mobile devices.
Access the Settings panel from the main menu and see below for instructions how to configure system features under each tab.
General
General tab contains general settings.
Site settings
Provides settings for the site.
- Site name - name of your site that shows up on the home page
- Site URI - Streams Manager (or custom) domain URI of the site. This is important as it impacts where users are redirected to confirm their site login, reset passwords, etc.
Administrator contact settings
Provides settings for administrator contact.
- Administrator email - email address that is used to send messages from the system to the site administrator, relay contact us messages from users, etc.
- Administrator Discord ID - Discord ID that is used to send DMs from the system to the site administrator, relay contact us messages from users, etc. This is not the Username#1234 type of ID. It is all numeric Discord ID (https://support.discord.com/hc/en-us/articles/206346498-Where-can-I-find-my-User-Server-Message-ID).
Page settings
Provides settings for customizing certain page content.
- Contact us page enabled - indicates whether Contact Us page will show up for users.
- Home page is public - indicates whether the Home page should be publicly accessible or only after a login
- FAQ page is public - indicates whether the FAQ page should be publicly accessible or only after a login
Logo settings
Allows upload of a new logo shown in the left corner of the page. Custom logo which must be in PNG format with transparent background and be less than 5 MB in size. Dimensions of the logo should be between 64 and 250 pixels long and no more than 64 pixels tall.
Email notifications
Allows for setup of email servers and email notification templates. Please note that setting up email (SMTP) server is REQUIRED for the system to work properly.
SMTP settings
You can use your own SMTP server by providing the SMTP settings in outlined fields. Click the Test button and enter a test email address where test email will be sent. If you do not have an SMTP server you are already using, it is easy to set up Gmail as the SMTP server. Please follow these steps:
- Register a new or use an existing gmail account
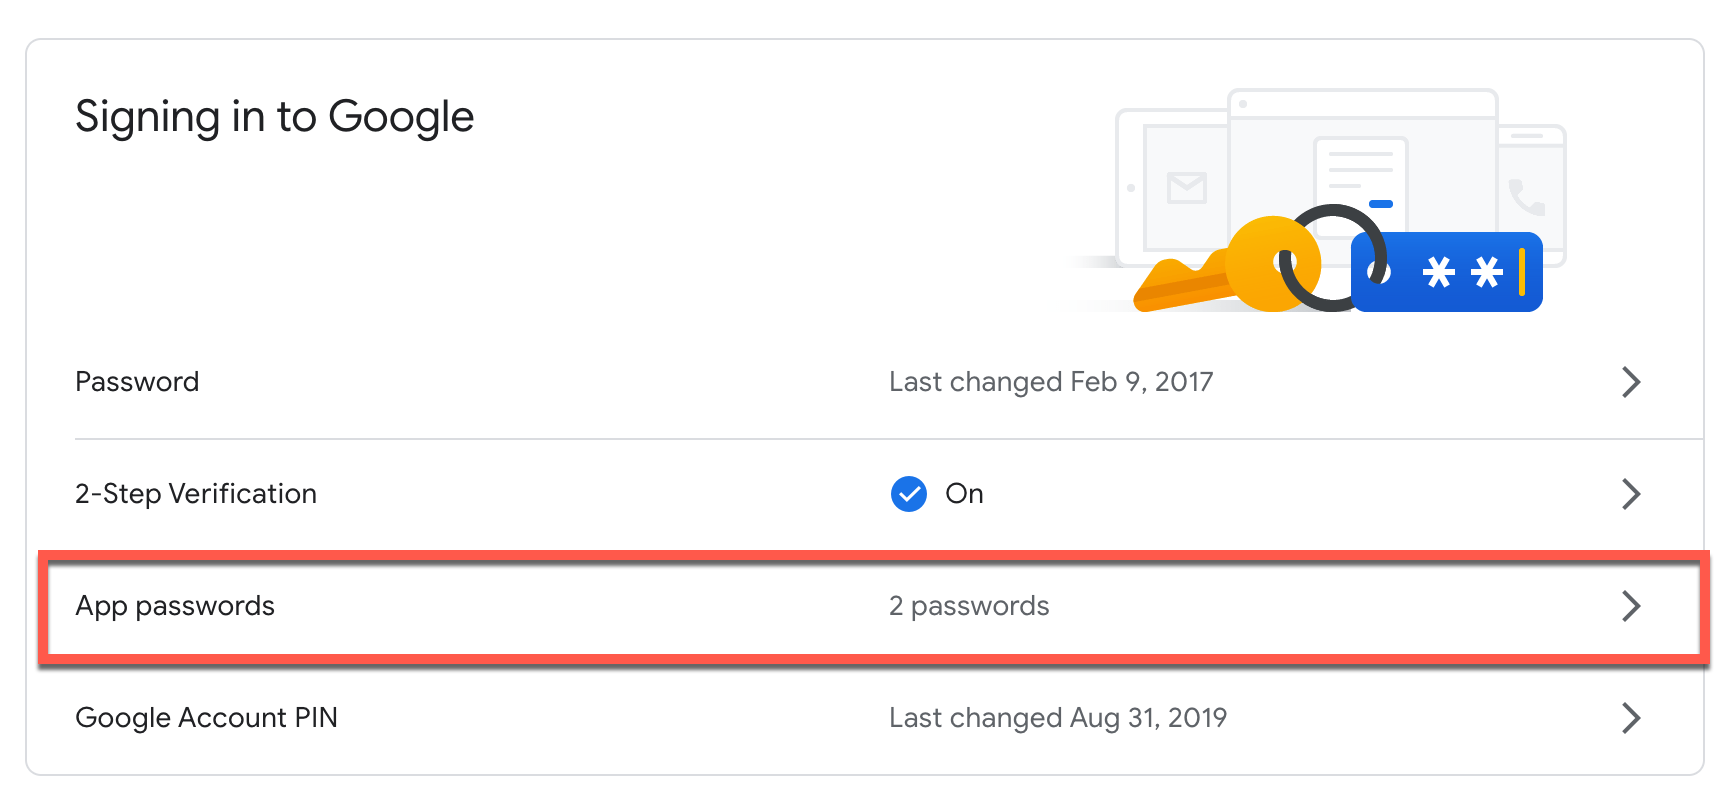
- Create an app password for the Gmail account (this only works with app passwords - using your regular Gmail password WILL NOT WORK) as outlined here: https://support.google.com/accounts/answer/185833?hl=en. For you to see App Passwords options, you need to have 2 Step Verification turned ON.
- Set SMTP information (required fields)
- SMTP host: smtp.gmail.com
- SMTP port: 587
- Username: your gmail email address
- Password: app password you just created
- From email:your gmail email address
- Use SSL/TLS: ensure this is enabled
- Other fields are optional but recommended to set

Once everything is set, click Test button to send the test email and finally Save all the way at the bottom.
Notification templates
Streams Manager sends notifications to users or administrator when certain events occur in the system. Notification templates section allows you to customize the content of the messages that are sent. You can enable or disable message sending for each event and also customize the content of each message. Different events allow for use of different variables depending on the context.
Discord notifications
Allows you to enable and configure Discord notifications to users in your Discord server.
Discord settings
Streams Manager provides integration with Discord bots and uses them to send notifications to usersin your Discord server. Notifications can be of various types ranging from password resets, exceeding streaming limits or payment reminders. Note that users need to have their Discord ID field populated in their profile for this to work (https://support.discord.com/hc/en-us/articles/206346498-Where-can-I-find-my-User-Server-Message-ID).
Before you can enable this functionality, you need to create a Discord app and Bot for which you need to obtain a token.
Creating a Discord bot
- Create a Discord app, a bot and add it to your Discord server. Do NOT add the bot to more than one Discord server. Ensure that bot has Administrator rights when it is created and also that it has an Administrator role in your Discord server (i.e. can manage roles, etc.). See this video for instructions (from 1:57-4:30) https://youtu.be/aO4XokwEx6Q?t=117
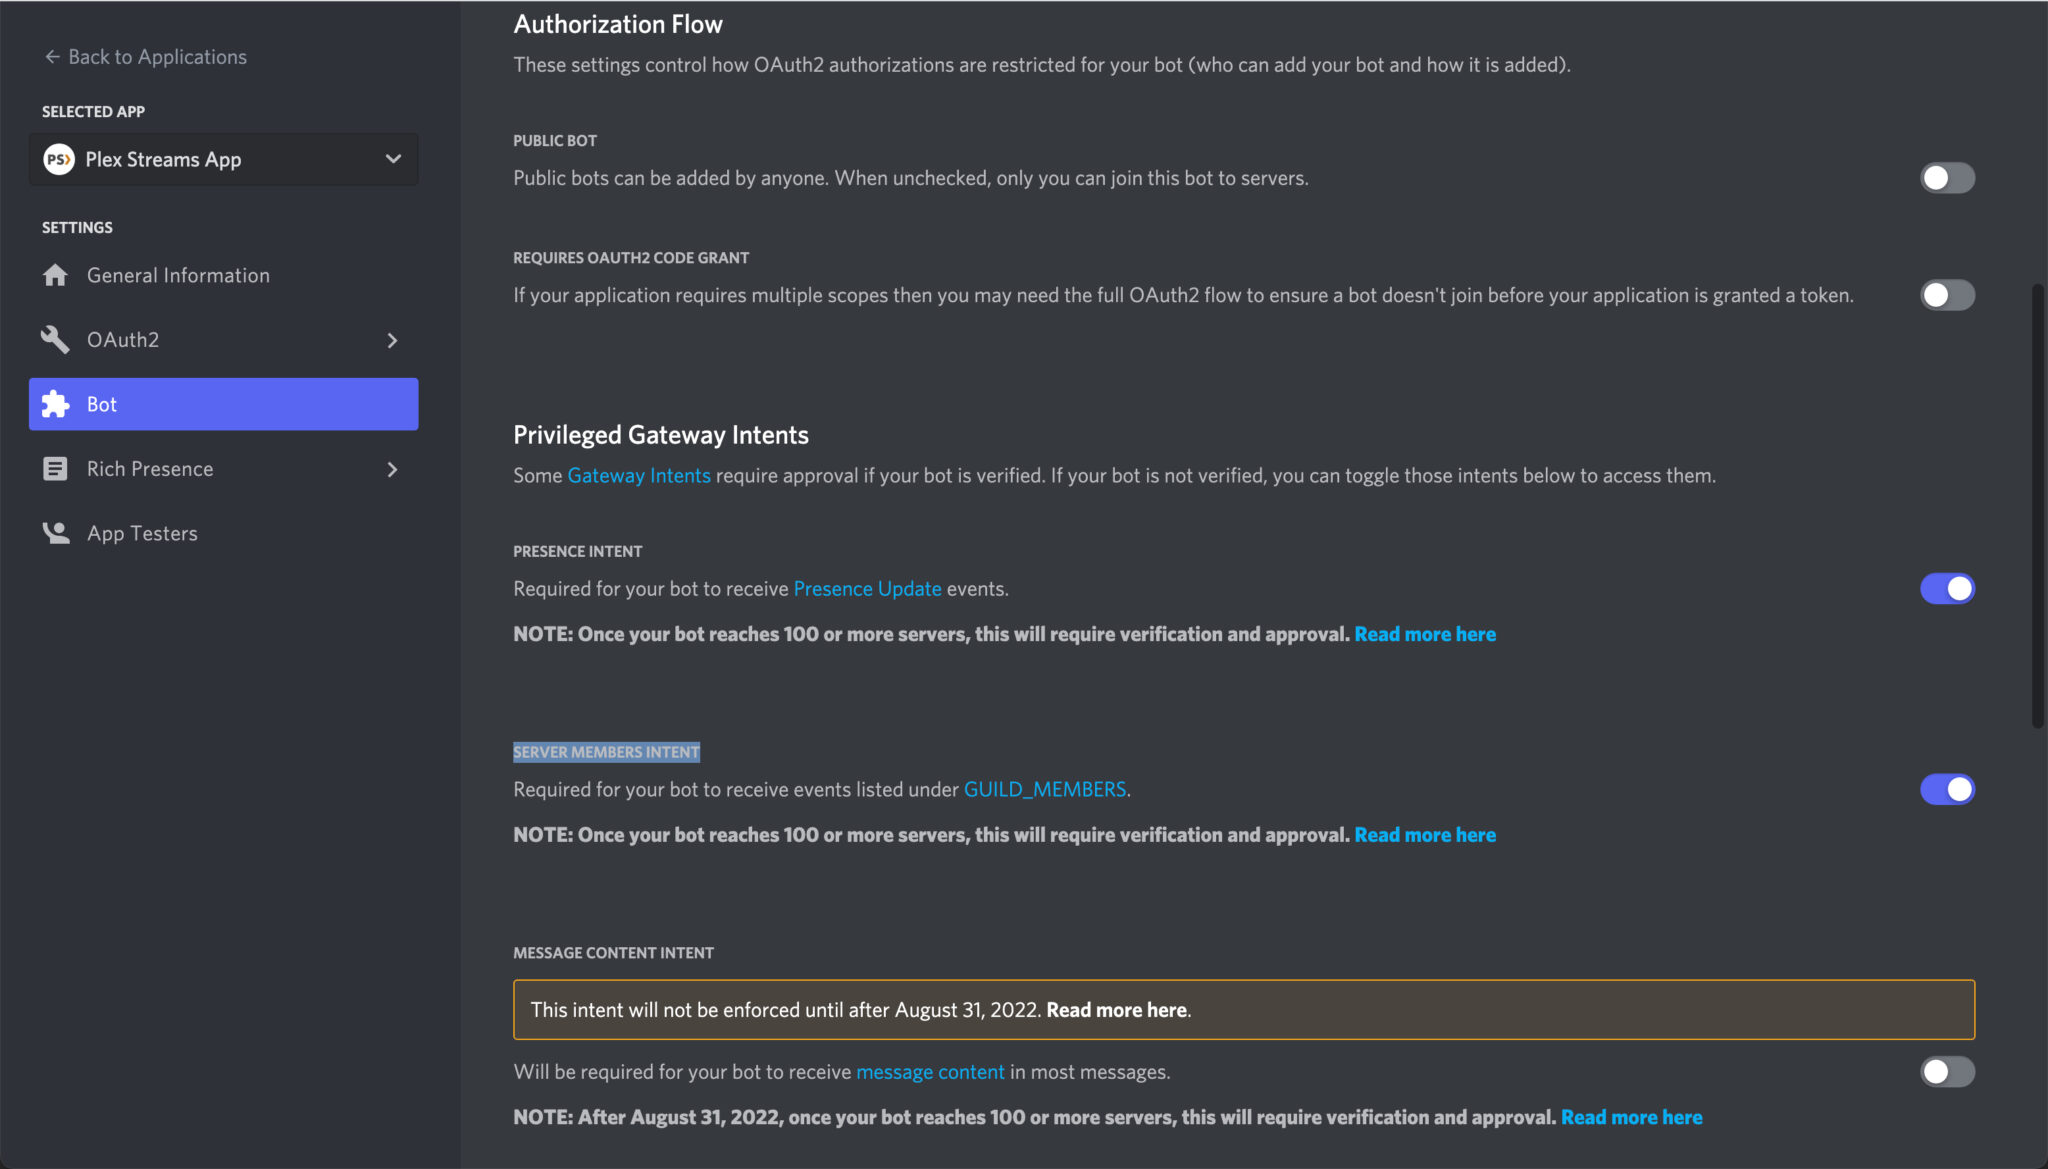
- Adjust Bot setting to give it proper access by clicking on the Bot on the left and enabling PRESENCE INTENT and SERVER MEMBERS INTENT
- Your bot should be assigned an admin role in your Discord server with access to all permissions (such as manager Roles, Kick Users, Send Messages, etc.)
- Once the bot is in your Discord server, copy the bot token and enter it in the Streams Manager. Please note that the bot does not need to show as online for it to work
- Click the Test button to test the settings. Test will attempt to fetch members of your discord server and add a role to one of the users

If you want a copy of the message sent to your users also be sent to another Discord user or users, populate Discord IDs field with a comma separated list of IDs of additional Discord users where notifications will be sent.
Notification templates
Streams Manager sends notifications to users or administrator when certain events occur in the system. Notification templates section allows you to customize the content of the messages that are sent. You can enable or disable message sending for each event and also customize the conte of each message. Different events allow for use of different variables depending on the context.
Payment Gateways
Streams Manager offers two payment options for your users:
- Pay as you go - users pay when their subscription is close to expiring, they can pre-pay ahead of time, etc.
- Recurring - recurring payments that are automatically charged by the payment gateway
In addition, Streams Manger offers three payment gateways for payment collection:
- PayPal – both PayPal personal account and PayPal business account are supported although PayPal business account is required for recurring payments on Streams Manager. PayPal changes 3.49% fee + 0.49 USD (in the US) on each transaction and you will get an income tax statement (1099-K) if you are in the United States if you make more than 600 USD per year. It is likely that there are similar tax implications in other countries
- Stripe – offers both pay as you go and recurring payments. They charge 2.9% fee plus 0.30 USD on each transaction. This has the same tax implications as PayPal
- Plisio – crypto gateway that offers only pay as you go payments via crypto coins. They charge 0.5% which is the lowest of the bunch
Lastly, Streams Manager also offers manual payment management where an administrator can manually enter information about payments they receive via other means such as different payment apps such as Venmo and CashApp.
Options for payment management
Administrators have several options when it comes to managing payments through Streams Manager.
- Your users use Streams Manager to make payments using PayPal, Stripe or Plisio. This method offers full integration and automation. If you have a PayPal personal or business account, Stripe account or Plisio account, you can enable any or all of those options which will allow your users to register and pay on the website and payments will be automatically entered into the system for you and Plex access provisioned to the user. From there, automatic reminders, removal or users if their payment lapses etc. is all done automatically. If users are using recurring payments, you can enable transaction sync and payments will be automatically entered into the system which will extend user’s subscription. Completely hands off but incurs fees from PayPal, Stripe and Plisio.
- Users send payments via PayPal to a personal PayPal account using fee free ways. This method also offers full integration and automation. If you want to avoid fees (and taxes) and if you have a PayPal personalaccount (business will not work), instruct your users to send you payments using fee free ways (i.e. send to friend or send gift), add the user to the system manually initially (invite via Users panel), enable transaction sync and payments will be automatically entered into the system for you once received and user’s subscriptions extended. From there, automatic reminders, removal or users if their payment lapses etc. is all done automatically. This obviously does not allow for recurring payments so users all have to manually send you money every pay period. The system will import the payments but this causes some people to forget, causes their subscription to lapse etc. Stripe also does not support this as they always take fees. Via PayPal personal account though, there are no fees.
- Manual payment entry. You manually enter payments you receive via any other means (cash, another payment app such as CashApp, Venmo, Patreon, ApplePay, etc.). By entering the payment manually, you will extend the subscription for the user. The system takes care of the rest as mentioned in the previous options.
General settings
Here you can specify the currency that will be used to charge your customers when using PayPal and Stripe. Plisio uses crypto coins.
PayPal settings
To utilize PayPal for payments on Streams Manager, you need to have a PayPal personal or business account (business is required for recurring payments). There are two types of integration:
- REST – Used for checkout and creating recurring subscriptions
- NVP – Used for transaction sync. REST API also has access to transactions but transactions take much longer to appear there
Both integrations require you to generate credentials and enter them into Streams Manager. When generating your credentials please pay attention to the following:
- Whether you selected Sandbox vs. Production (Live) since they use different credentials. Make sure to use the correct set based on the dropdown in Streams Manager. Credentials cannot be mismatched
- Ensure that no leading and trailing spaces are introduced when copying values and pasting them into Streams Manager
Streams Manager gives you an option to specify two PayPal accounts:
- Primary account - this account will be used for payments users made when subscribing via Streams Manager and can be used for transaction sync. If you wish to use recurring payments, this must be a business account
- Secondary account -this account can only be used for transaction sync
Why two accounts? PayPal has recently announced changes where business accounts can no longer receive peer-to-peer payments using "send to friend" or "send gift" options which previously had no fees. Using multiple accounts, you can setup a business account to be your primary for payments when users are subscribing via Streams Manager which will incur fees (as before). But if specifying a personal account for a secondary, it will allow you to get peer-to-peer payments from your subscribers without fees when they use "send to friend" method and Streams Manager will import those payments for you automatically and extend user's subscription all without incurring fees and be subject to taxation.
PayPal settings are as follows:
- Enabled - indicates whether to enable PayPal for payments
- Checkout enabled - indicates whether PayPal is enabled on the checkout page for pay as you subscriptions
- Recurring checkout enabled - indicates whether PayPal is enabled on the checkout page for recurring subscriptions
- Transaction sync enabled - indicates whether to enable periodic (hourly) PayPal transaction synchronization. This is required if recurring payments are enabled
- Environment - indicates whether to use real payments (Production) or test payments (Sandbox)
- Client ID - specifies client ID of your PayPal REST app
- Client secret - specifies client secret of your PayPal REST app
- NVP URI - specifies NVP client URI (https://developer.paypal.com/api/nvp-soap/apiCredentials/#:~:text=knowledge%20base%20article.-,API%20signatures,-To%20create%20an)
- NVP API username - specifies NVP API password
- NVP API signature - specifies NVP API signature
Generating PayPal REST credentials
PayPal has recently made some changes and do not allow you to get REST credentials for personal accounts anymore. One option is to upgrade to a business account, create credentials and call PayPal to downgrade. Any credentials you create, will continue to work.
To obtain REST credentials follow these steps:
- Login to PayPal Developer Dashboard
- Navigate to My App & Credentials on the left nav bar
- Under the My apps & credentials heading make sure that “Live” tab is selected
- Under REST API apps, click “Create App” button
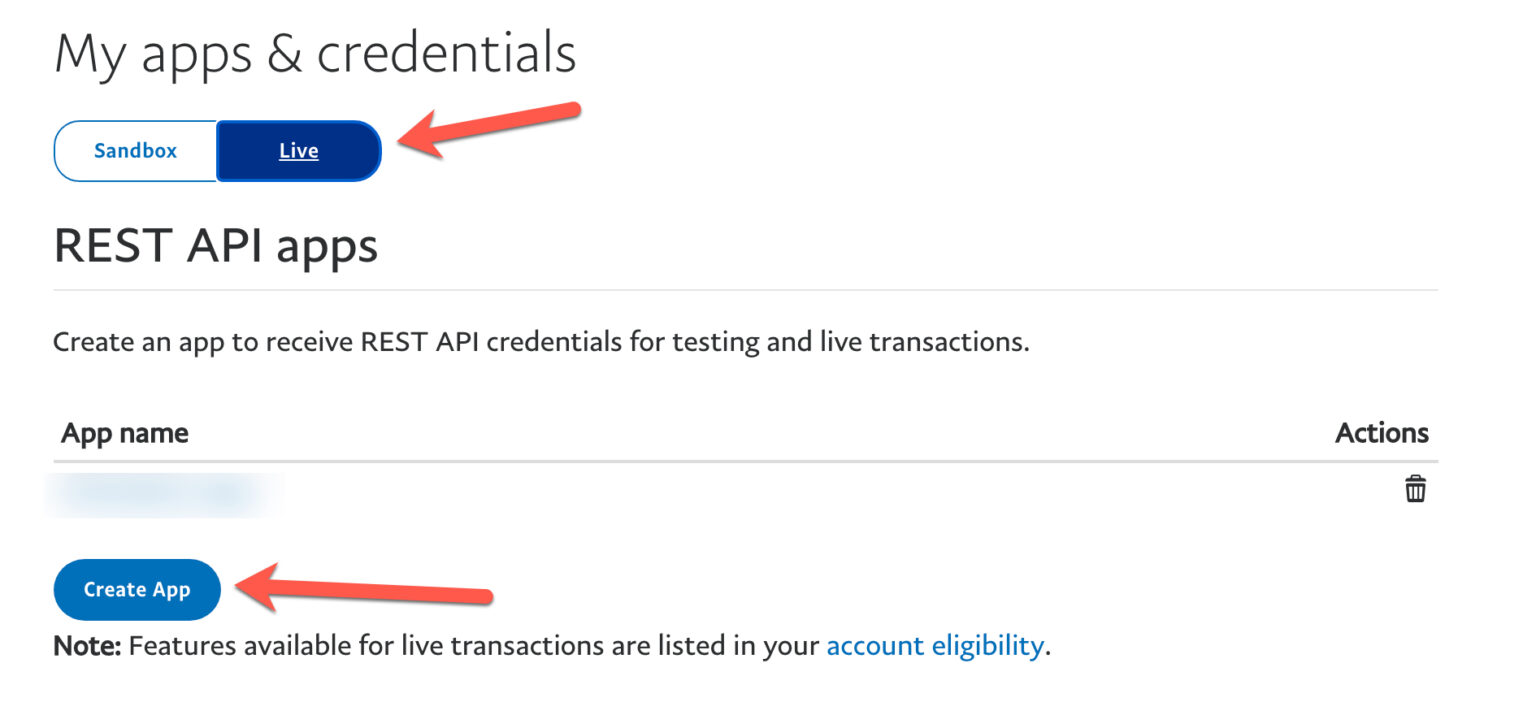
- Give your app a name and click Create App
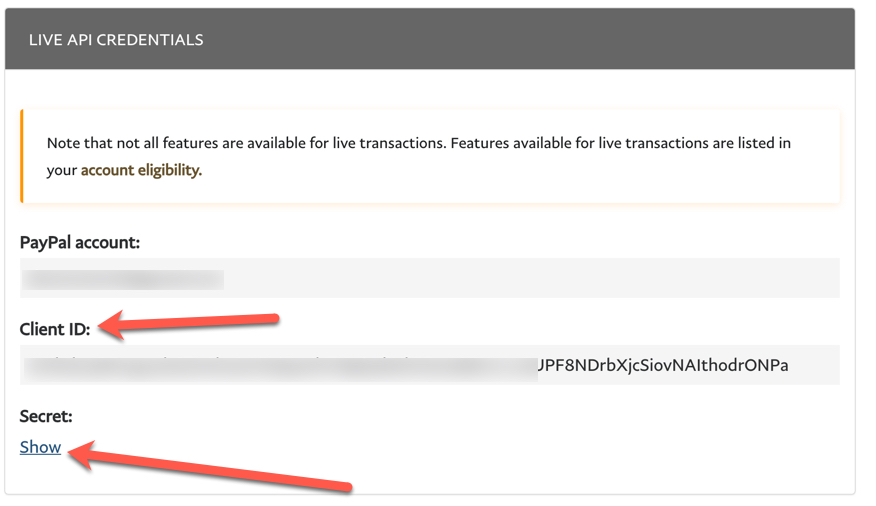
- On the next screen, your credentials will show. Copy the Client ID into the Client ID text box in Streams Manager and click on Show link to reveal the Secret. Copy the secret into the Client Secret text box in Streams Manager. Make sure no leading or trailing spaces are introduced while pasting
- Scroll down to the bottom of the page and ensure that correct permissions are selected. Transaction Search needs to be checked!
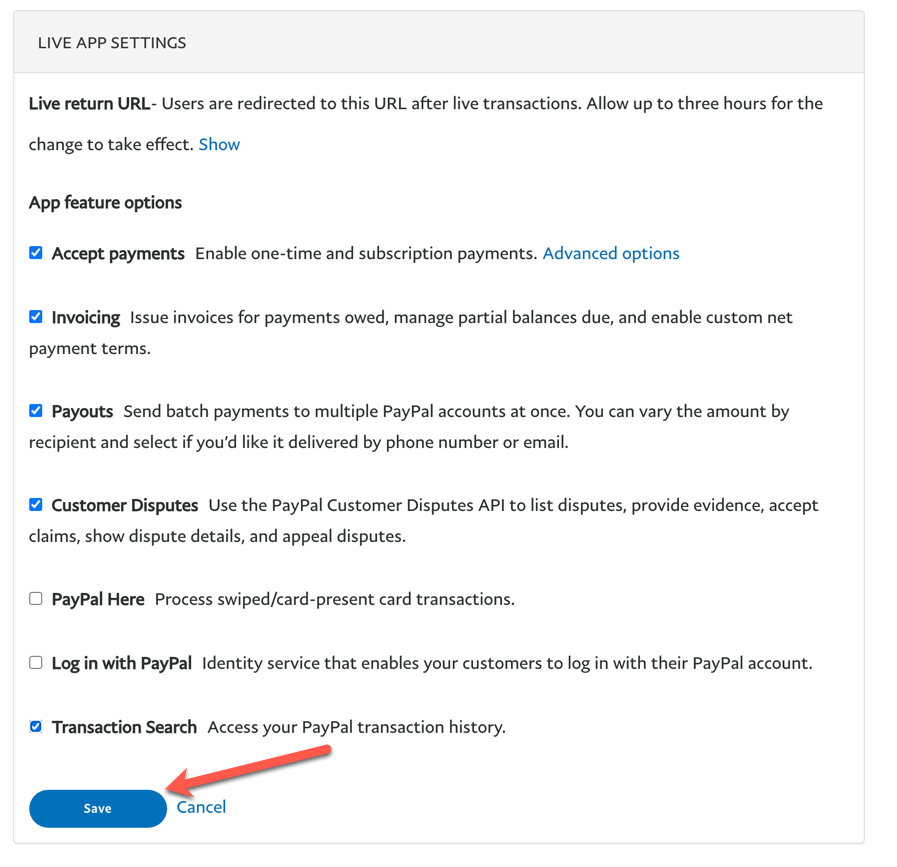
- Click Save to save changes.
- Click Test button to test the settings


Given that Transaction search permission is not granted by default, once you grant it, it may take several hours for that change to take effect. When testing the settings, if you get PERMISSION_DENIED error, make sure you have the Transaction Search permission checked and if you do, simply wait for the PayPal cache to recognize this change and try again in a few hours.
Generating PayPal NVP Credentials
PayPal has recently made some changes and do not allow you to get NVP credentials for personal accounts anymore. One option is to upgrade to a business account, create credentials and call PayPal to downgrade. Any credentials you create, will continue to work.
Please follow these steps:
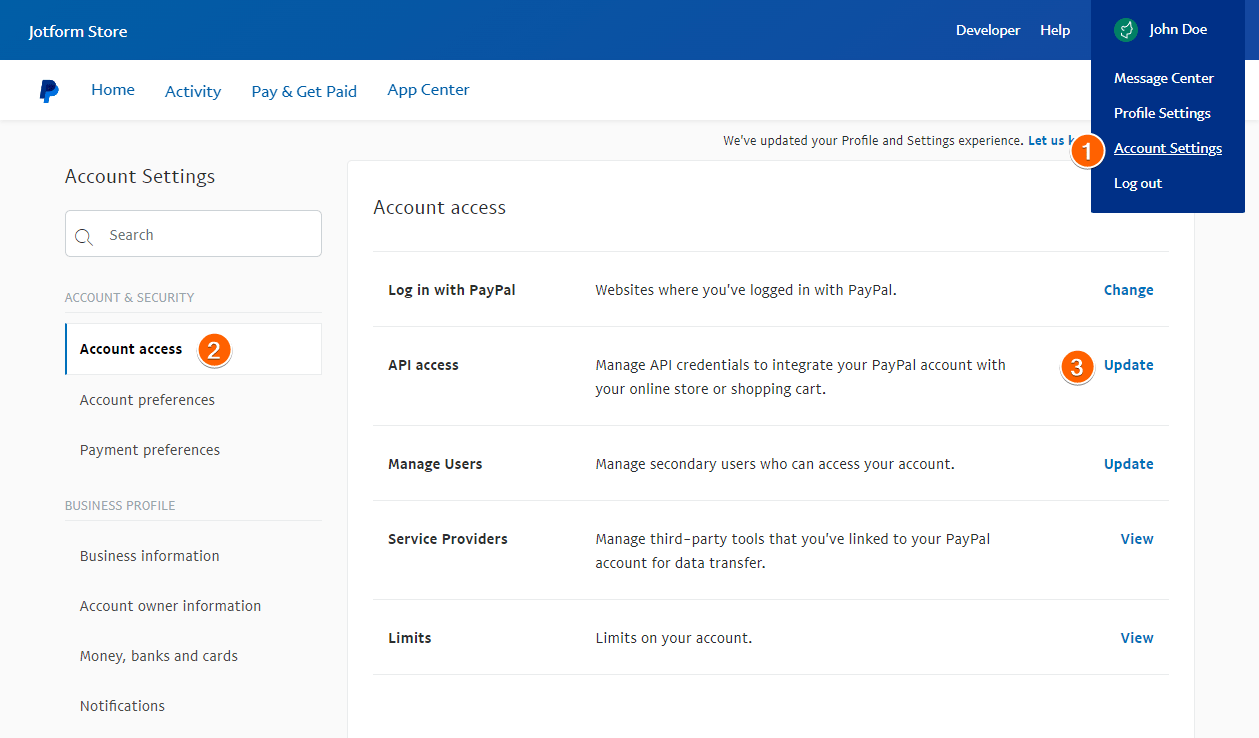
- Log in to PayPal.
- Navigate to the following:
- Account Settings
- Account Access
- Click the Update link from the API Access section.
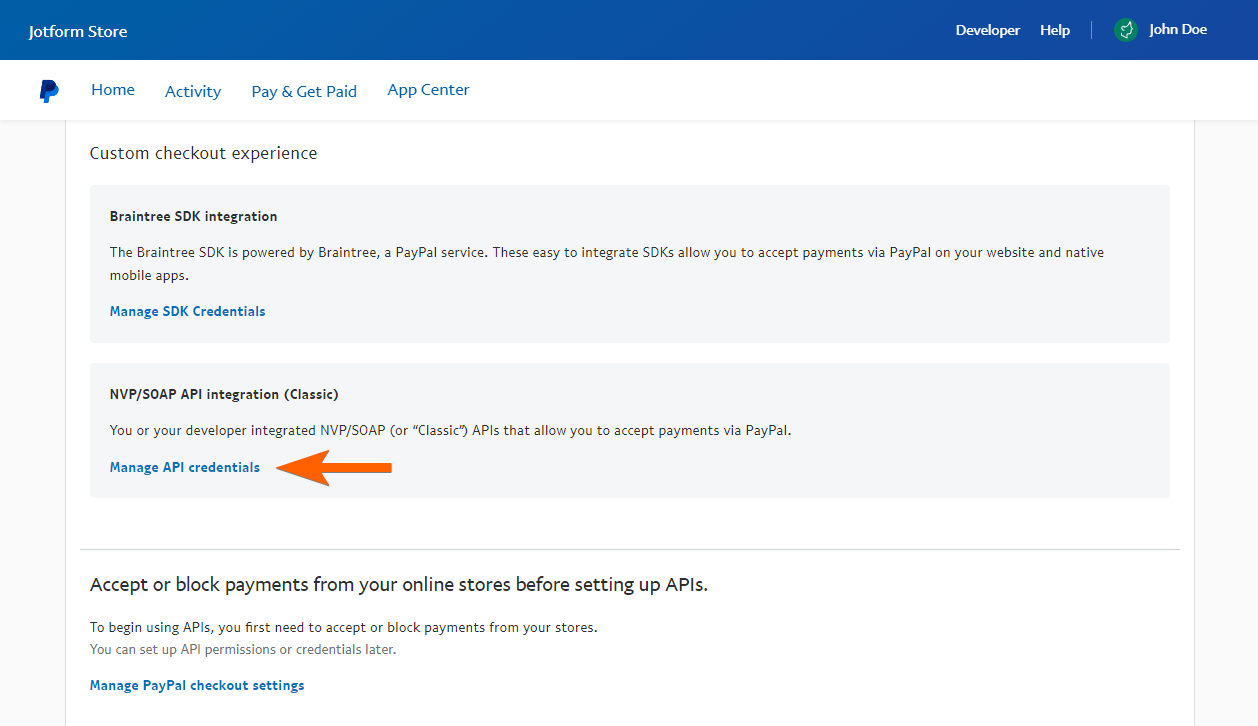
- Scroll down to the Custom checkout experience section.
- Click the Manage API credentials link under NVP/SOAP API integration (Classic) option:
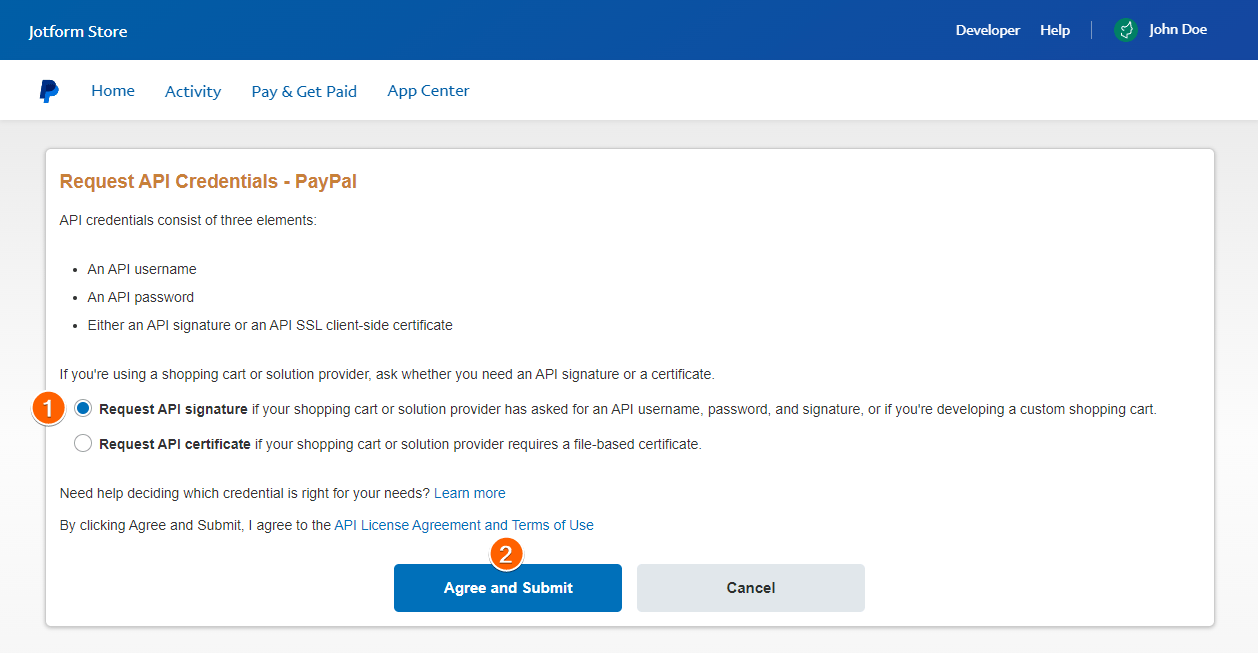
- If you haven’t set this up before, PayPal will prompt you to request the API Credentials. Choose the Request API signature from the list of options.
- Click the Agree and Submit button.
- Click the Show link for each key to copy them.
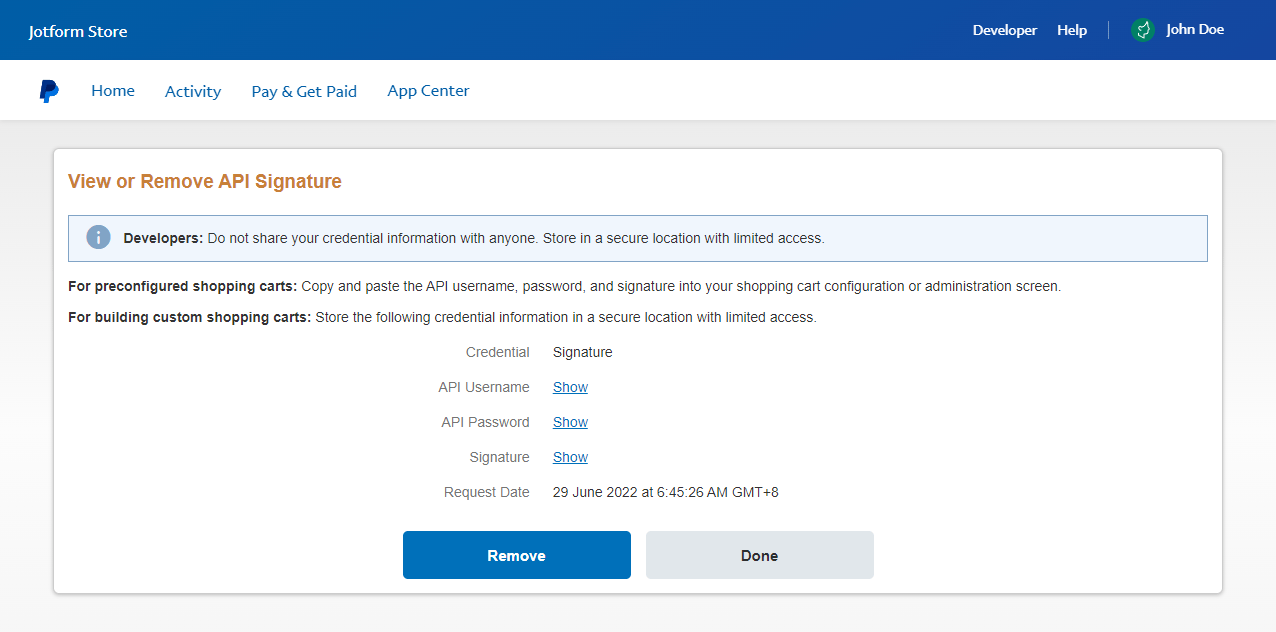
- Finally, click the Done button.
Stripe settings
Stripe integration allows you to accept pay as you go and recurring payments via Stripe. If you just opened a Stripe account, you may not be able to process live charges immediately until Stripe approves your account. In addition, Stripe will eventually verify your account where they will ask you to provide a site where you sell your products. You will have to provide a site where you appear to be selling legitimate products so keep that in mind when you supply URL of your site to Stripe.
Stripe settings are as follows:
- Enabled - indicates whether to enable Stripe for payments
- Checkout enabled - indicates whether Stripe is enabled on the checkout page for pay as you subscriptions
- Recurring checkout enabled - indicates whether Stripe is enabled on the checkout page for recurring subscriptions
- Transaction sync enabled - indicates whether to enable periodic (hourly) Stripe transaction synchronization. This is required if recurring payments are enabled
- Publishable key - Stripe publishable key
- Secret key - Stripe secret key
- Client secret - specifies client secret of your PayPal REST app
Stripe integration is done using Stripe API keys. To generate your API keys, follow the steps below:
- Login to your Stripe account on https://stripe.com
- Navigate to https://dashboard.stripe.com/apikeys
- Ensure that the view test data toggle is OFF
- Copy the Publishable key and Secret key and paste them into Streams Manager. Ensure that no leading and trailing spaces are introduced
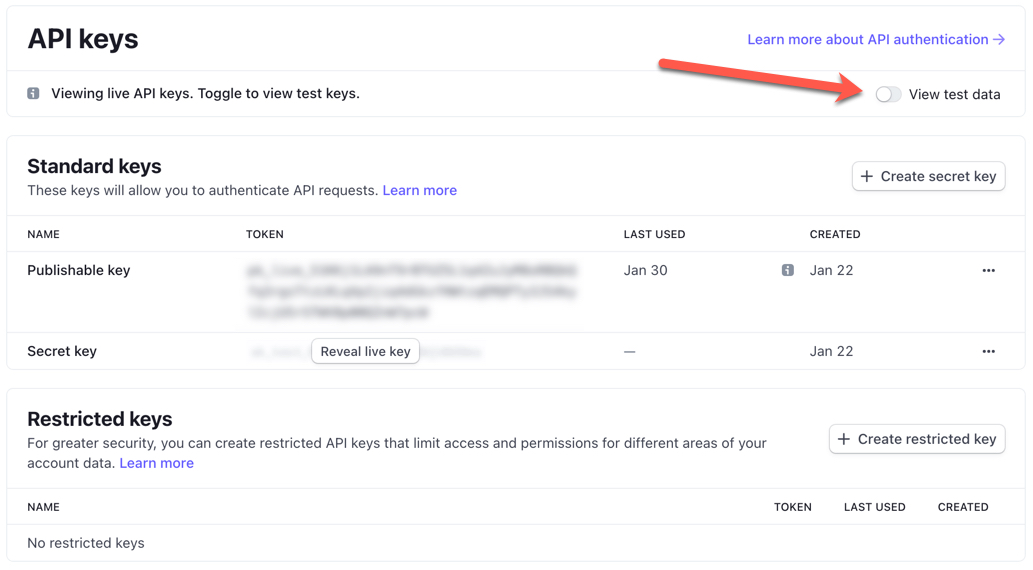
- Click the Test button in Streams Manager to test the keys.

Plisio settings
Streams Manager allows integration with Plisio as a payment gateway for crypto payments for pay as you go payments ONLY. To learn more about Plisio, please visit: https://plisio.net.
Plisio settings are as follows:
- Enabled - indicates whether to enable Plisio for payments
- Checkout enabled - indicates whether Plisio is enabled on the checkout page for pay as you subscriptions
- Default crypto coin - default coin that users will be presented during checkout. They can still change the coin to one of the allowed coins you set in Plisio
- API secret key - Integration key for Plisio
To enable Plisio, please follow these steps:
- Create a free Plisio account on https://plisio.net
- Login to your new account
- Click on API menu option in the top bar
- Click on the plus button to add a shop
- Enter your shop name and URL. The URL should be your Streams Manager URL like https://my-subdomain.streamsmanager.com where you replace ‘my-subdomain’ with your actual subdomain
- Click Save
- Click on Site Settings and enter the following information:
- Integration Type: Custom
- Secret key: copy the key and enter it in Streams Manager
- Request IP: leave blank
- Status URL: leave blank
- Success URL: https://my-subdomain.streamsmanager.net/subscribe/plisio-success. Replace ‘my-subdomain’ with your actual subdomain
- Failed URL: https://my-subdomain.streamsmanager.net/subscribe. Replace ‘my-subdomain’ with your actual subdomain
- Who pays commission: select appropriate value for your setup
- Supported currencies: Select which coins you plan on accepting. Leaving it as Any will allow all supported coins. Make sure that the default coin as set in Streams Manager settings under Payment Gateways -> Plisio is in the selected list
- Expiration period: 30
- While label processing: ensure this in NOT checked
- Test the setting by clicking on the Test button
- Save the settings
Registration settings
Streams Manager allows your users to register on the site to subscribe and manage their account like changing their plan, extending their subscription, etc. The system allows for some control over how the registration process works.
- Registrations enabled - indicates whether registrations are enabled. When turned OFF, nobody will be able to register.
- Public registrations enabled - indicates whether public registrations are enabled. When turned OFF, people who are not already sharing one of your Streams server will NOT be able to register. Only people sharing a server will be able to do so. You can get around this usingreferral codes (see below)
- Allow registrations using referral codes - when turned ON, even if public registrations are disabled, a person can register on the site if they are given a referral code from another user who is already sharing one of your servers. Every user can see their referral code on the My Account panel. This will also allow you to track who referred someone
- Require Discord information during registration - when turned ON, during registration users will have to enter their Discord username and ID to be able to register
Payment reminders settings
Streams Manager by default sends payment reminders to your users when their subscription is close to expiring. Only non-permanent users on Pay as you Go subscriptions or on Recurring subscriptions that have been cancelled (in Paypal or Stripe) get payment reminders. Users on active Recurring subscriptions or permanent users do not get payment reminders.
Settings in this sections allow you to customize whether and when payment reminders are sent.
Payment reminder settings are as follows:
- Send payment reminders - indicates whether the system will send payment reminders to users
- Days prior - comma separated list of days prior to expiration payment reminder will be sent. For example: 1,3 will send payment reminders 3 days prior to expiration and then again 1 day prior to expiration if a user has not renewed their subscription in the meantime.
Payment reminders are sent via email (if enabled) and via Discord (if enabled). To customize the payment reminder message that is sent to users, change the notification template associated with Subscription Expiring Soon event that is available in both Email notificationsettings and Discord notification settings.
Subscribe & trial settings
These settings allow you to enable or disable regular and trial subscriptions.
Subscription settings
The settings are as follows:
- Subscription enabled - indicates whether subscriptions through the website are enabled. When enabled, subscribe link will be shown in the main menu and a subscribe button on the main page. When enabled, at least one plan has to be configured.
Trial settings
The settings are as follows:
- Trial enabled -indicates whether free trial subscriptions through the website are enabled. When enabled, free trial link will be shown in the main menu. When enabled, at least one trial plan has to be configured.
- Force trial prior to subscription - Indicates whether users have to sign up for a trial first before subscribing to a paid plan.
- Maximum number of trial users - indicates the maximum number of trial users allowed in the system (set to 0 for unlimited). When the limit is reached, users will be prevented to start free trials.
Requests integration settings
Streams Manager allows integration with request systems such as Ombi, Overseerr and Petio.
Ombi settings
Streams Manager integration with Ombi consist of Streams Manager syncing Discord information to Ombi users so they can be notified when their requests are approved and fulfilled. Streams Manager does NOT create user accounts in Ombi for uses in Streams Manager. This is not necessary because Ombi allows for integration with multiple Plex servers and syncing of Plex users into Ombi. Streams Manager will then also sync their Discord information. This synchronization happens once per day at 5 AM UTC.
The settings are as follows:
- Ombi notification preferences sync enabled - indicates whether sync with Ombi request system is enabled. When enabled, user Discord notification preferences will be synced on a scheduleonce per day at 5 AM UTC
- API key - Ombi API key as set in Ombi under Settings -> Configuration -> General
- URL - base URL to the Ombi system
- Username - username of the Ombi administrator
Once the settings are populated, you can test the setting by clicking on the Test button.
Overseerr settings
Streams Manager integration with Overseerr consist of Streams Manager creating local accounts for new subscribers in Overseerr and syncing their Discord information so they can be notified when their requests are approved and fulfilled. Overseerr account is created for new subscribers immediately upon subscription and fully synchronized once per day at 5 AM UTC. Note that Overseerr must have an email agent configured for the integration to work properly since once new account is created in Overseerr, login credentials need to be emailed to the user.
The settings are as follows:
- Overseerr user sync enabled - indicates whether sync with Overseer request system is enabled. When enabled, new local Overseerr accounts will be created for all Streams Manager users and Discord notification preferences will be synced.Full synchronization runs on a scheduleonce per day at 5 AM UTC
- API key - API key as set in Overseerr under Settings->General
- URL - base URL to the Overseerr system
Petio settings
Streams Manager integration with Petio consist of Streams Manager creating local accounts for new subscribers in Petio and sending users a notification (email or Discord) with login credentials. Petio account is created for new subscribers immediately upon subscription and fully synchronized once per day at 5 AM UTC.
The settings are as follows:
- Petio user sync enabled - indicates whether sync with Petio request system is enabled. When enabled, new local Petio accounts will be created for all Streams Manager users. Full synchronization runs on a scheduleonce per day at 5 AM UTC
- Petio email - Petio administrator email address used to login to Petio
- Petio password - Petio administrator's password address used to login to Petio
- URL - base URL to the petio system
- Profile name - name of the Petio profile to assign to new users. Leave blank to assign a Petio default profile
Discord integration settings
Streams Manager offers Discord integration in the following ways:
- Discord member management -Streams Manager will kick users that have let their subscriptions expire after a set time period
- Discord role management -Streams Manager will keep user roles in sync based on their plan and Plex server where they are currently sharing libraries
This integration works through the use of bots so you will have to create a bot and obtain a bot token. You can use the same bot you use for Discord notifications as described in Creating a Discord bot.
The settings are as follows:
- Discord sync enabled - indicates whether integration with Discord server is enabled. When enabled, new users will be assigned a role and expired users will have their role removed and optionally kicked out of the Discord server.
- Bot token - Discord bot token
- Subscriber role name - name of the role to assign to Discord users that are currently active and on a non-trial plan
- Trial role name - name of the role to assign to Discord users that are currently active and on a trial plan
- Kick users - indicates whether to kick users from the Discord server after their subscription has expired
- Kick after days - specifies for how long (in days) user's subscription must be expired before they are kicked from the Discord server. Set to 0 for immediate removal
Plex integration settings
Streams Manager offers integration with your Plex account and Plex servers. This section governs how that integration works. The settings are as follows:
- Sync from Plex - indicates whether to synchronize any new or changed Plex servers, users, shared servers and invites from Plex. This should be ON in general.
- Plex servers to ignore - comma separated list of Plex server names or their client identifiers to ignore during Plex sync. When populated,Streams Manager will not import Plex servers with specified name. This can be useful in cases where you have a basic plan which allows a single server but your Plex account has multiple Plex servers attached
- Import new users as permanent - indicates whether new users should be marked as permanent when they are imported from your Plex account. This setting is especially important when doing a user sync for the first time. When turned OFF, any Plex user that shares your Plex server that is not tracked inStreams Manager will be imported and assigned to a default plan and be active for the duration of the default plan
- Sync shared libraries to Plex - indicates whether to sync which libraries are shared with users based on what their plan allows. When turned ON,Streams Manager will share or unshare libraries based on which libraries are included in their plan automatically (and also if their plan changes). Generally, this should be turned ON
- Remove expired users from Plex - indicates whether to remove users whose subscription has expired from Plex servers. When tuned ON, when user's subscription expires,Streams Manager will remove them from the Plex server they were sharing
- Remove expired users from Plex after days - once user's subscription is expired over this many days ago, only then remove the user from Plex account and all servers. Once removed, users will need to join again with a new invite. Leave empty to remove users immediately upon expiration and not provide a grace period
- Remove library access when users expire - indicates whether to remove access to media libraries for users whose subscription has expired. When "Remove expired users from Plex" is enabled, this setting also must be enabled
- Refresh library statistics periodically -indicates whether to enable and refresh library statistics periodically. Library statistics are shown on the homepage
Custom content
Thi sections allows you to configure and customize content on certain pages.
Home Page Section 1 Content
This section is displayed directly below the wallpaper on the home page. You can enable it and specify custom HTML content to display there or use default content that looks like this:

Home Page Section 2 Content
This section is displayed directly below the section 1 on the home page. You can enable it and specify custom HTML content to display there or use default content that looks like this:

Pricing Content
This section is displayed directly below the section 2 on the home page. You can enable it and specify custom HTML content to display there or use default content that looks like this:

When using default content option, this section will automatically update with plans as they are changed. If custom content is used, you must maintain the accuracy of this section and keep it up to date when you change plans.
Subscription Page Content
This section is displayed at the top of both Subscribe Recurring and Subscribe Pay as You Go pages. You can enable it and specify custom HTML content to display there.
Library Statistics Section Content
This section is displayed directly below the pricing section on the home page. You can enable it and specify custom HTML content to display there or use default content that looks like this:

Streams Manager will refresh library statistic every day from a server that is specified in this section and display those library statistics here. If you choose to use custom content, the following variables/placeholders are available that will be replaced with actual values. Keep in mind that the ID in the variable/placeholder needs to be replaced with actual library section ID as shown on the Libraries panel. For example, correct variable/placeholder to use in the custom content would be:##Library-345689-MovieCount##.
- ##Library-ID-MovieCount##
- ##Library-ID-ShowCount##
- ##Library-ID-SeasonCount##
- ##Library-ID-EpisodeCount##
- ##Library-ID-ArtistCount##
- ##Library-ID-AlbumCount##
- ##Library-ID-TrackCount##
- ##MovieTotalCount##
- ##ShowTotalCount##
- ##SeasonTotalCount##
- ##EpisodeTotalCount##
- ##ArtistTotalCount##
- ##AlbumTotalCount##
- ##TrackTotalCount##
Miscellaneous settings
Miscellaneous settings are located in this section. The settings are as follows:
- Weekly download limit - specifies how many downloads users can perform per week by default and it applied to users who are on plans that allow mobile downloads. This can be overridden per user on user details screen. Keep in mind thatStreams Manager cannot strictly enforce download limits as Plex currently does not offer the ability to stop one's download (there used to be the ability to stop the old sync operation). It will just send a warning message to the user and log a warning against their account
Was this article helpful?